The 4 Must Have AIM RS3 Telemetry Channels
Hey guys, what’s going on? Today I wanted to show you exactly my four goto telemetry channels on my Aim Race Studio 3, so you can copy and pa…
Hey guys, what’s going on? Today I
wanted to show you exactly my four goto
telemetry channels on my Aim Race Studio
3, so you can copy and paste them into
your next analysis. Now, we all know
that telemetry analysis is super
important because it basically unveils
all of the hidden places where you’re
losing time. I do it every single day,
every single session. Not only when I’m
in driving, but also when I’m doing the
coaching to the the drivers at Bayris
and I’m, you know, helping them finding
lap time, not only in terms of driving
uh improvements, but also in terms of
setup and engine tuning improvements.
So, let’s get into it. The number one
channel I obviously include on my on my
chart. Basically, this is my AIM Rio3.
you know I have multiple uh you know
I’ve got multiple profile available one
is for the lambda one is for the you
know for the web etc. This is on my
desktop whereas on my PC on my laptop
got like six or seven different oh no I
said that all right seven or eight uh
different profiles with all different
configurations but the number one
channel I use in all my profiles is the
GPS speed. Well I guess it’s quite
obvious right? I mean, you can check
anything, but if you if you don’t have
your speed and you don’t know what what
kind of speed you’re traveling, I mean,
there’s there’s no point looking at
anything else. Now, in some cases, you
may want to you may want to just look at
the chassis and you can just, for
example, just look at the at the lateral
acceleration against, for example, the
longitudinal acceleration. So, lateral
versus longitudinal G. And you can
basically look for example on the on the
map you know with the racing lines you
can have a look okay you know in this
case um you know this is two sessions
from the same driver I’m like okay in
this session the driver in the green
session the driver is able to break a
lot more here in the mechanics corner at
Lonato getting up to for example 83 gs
against 07 well 0.83 three are here too
into the into turn three basically. So
you can see these kind of things if you
just look at the grip level and you know
how much uh longitude lateral G you
don’t need the the speed. Well you could
actually add it but it’s not necessary
but in all the other scenarios I want
speed to be there at any given time
because without speed basically it’s
like uh everything else is um is is
meaningless. But you can see that with
GPS speed, the only thing I don’t really
love about any basically any system is
that there’s a lot of spikes as you can
see like you can’t rely too much on
that. Obviously there’s uh you know
there’s bit too many spikes and that’s
why AI IM and other you know and also
Uniro I guess and and Alfano they all
provide the chance for you to basically
add an extra sensor that is connected to
your rear axle that basically tells your
like wheels spinning speed basically and
so you can track with with with very
little spikes your yeah you’re just like
your wheel speed very very accurately.
You can also have uh so you can have one
sensor on the rear axle and one sensor
on the front axle which is you know uh
what they do in formula cars obviously
you can tell that the difference in
terms of speed from the front to rear so
you can tell if there’s under steer if
there’s over steer if there’s wheel spin
in the rear etc. So there’s I used it in
my KZET quite a lot the rear axle speed
because it shows you when your wheels
spinning or when you’re locking the
tires on the brakes which is impossible
to tell from the GPS speed. But let’s
say 99% of the times you’re just going
to rely on GPS speed and just hope that
it’s it’s good enough to to not have too
many spikes. But remember the GPS speed
is important. you always have to overlay
it with RPM and that’s your second
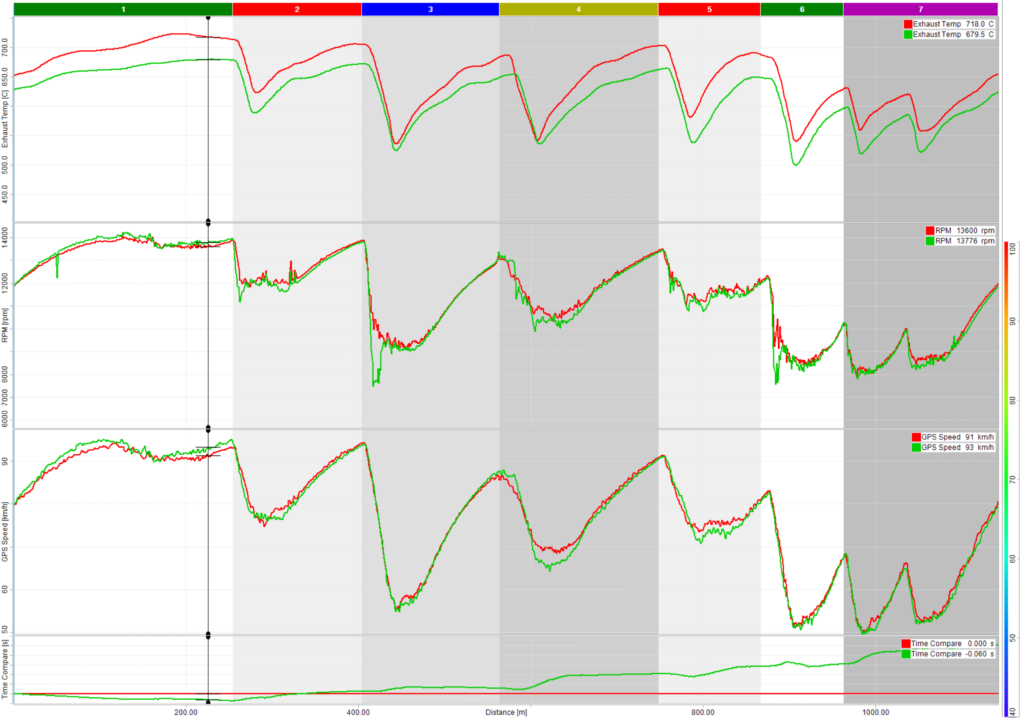
channel that you want to include. RPMs
are so important because well, you know,
RPMs stands for revolutions per minute.
I mean, I hope you um I hope you know
what I’m talking about. Basically, it’s
that electrical cable that is connected
to your um to your basically spark plug
um cable. How do you call that? But
yeah, it’s basically connected to the
coil and of the spark plug basically.
And um it just tells you the revolutions
per minute. So you know how how fast
let’s say the the wheel is spinning uh
per minute and and um yeah I mean for
example in in mini this is like a mini
30 race at Lonato and I can see that the
max RPMs here we can see is 14,200. Uh
the minimum here in the corner is like
9,000 there. Um well if we go into very
very lowest point. Okay, here’s locking
up the tires and he gets up down to
7,600. Otherwise, it’s like in the
middle corner of the second hairpiece
like 8,100. Um, so yeah, that’s um um
yeah, just in terms of RPMs, the reason
why I I want to use RPMs, okay, not only
to validate the speed because have a
look for example here, you can see that
the RPM curve is way smoother than the
speed curve. As you can see, the speed
curve has a lot of um has a lot of
noise, has a lot of uh spikes here and
there, which is not ideal. Whereas the
RPMs is yeah, it’s quite a bit smoother.
It also has some spikes, you know.
Again, it’s it’s very hard to have
perfect ones. Okay, you know why is
having the spikes though is because it’s
like hitting the curb a little bit here
also into the first corner. He’s hitting
the curb here also in the exit of of
turn three, which is the bar corner.
And here we have a massive spike because
it’s locking the tires under the
braking, which again makes sense. Um and
um and yeah, so you’re going to see
occasional spikes here and there, but um
but yeah, the great thing about the RPMs
is a lot more consistent and a lot
smoother in general compared to the
speed. And it can always tell you yeah
whether whether the speed trace is right
or it has like for example here there’s
a massive spike in speed but you don’t
see equally a massive spike in RPM. So
what it shows is that probably this is a
bit unreal you know it went from
basically like 92 to like 94 was that
yeah it looks like a mice spike but it’s
not that much but anyways you can see
that it’s not validating the RPM so
much. So it’s like okay that must be
just a GPS thing. So I use G RPMs a lot,
not just obviously to validate the
speed. I mean uh obviously the way I use
RPM is to to tell how much the driver is
keeping up the RPMs in the midc corner
whether he’s making nice open line or is
being the corner too much. You know uh
for example this is again the same
driver in two different sessions. The
red is qualifying and the green is the
final. As you can see the there’s a huge
difference in terms of minimum speed
here in the double left at Lonato and
also in terms of RPMs. It’s it’s kind of
validated as you can see in this area we
got 10,200 RPMs for the green against
10,900. It’s about 700 RPMs difference
and that’s 3 km an hour in this in this
corner in this in a specific place. So
all the way through the corner the green
is doing more of a V. As you can see,
it’s attacking more the entry. As you
see on the entry, it’s going a bit
deeper, a bit faster, but it’s stopping
too much in the mid. And in terms of
delta time, which is our third channel
delta time, as you can see, in terms of
delta time, it’s going from 058 to 0 to
133. So, it’s like almost 1.610 loss in
just this corner alone. And I used RPMs
just to to see what I what he was doing
basically is that he’s keeping all uh
you know it’s g me like six what do you
say 600 RPMs less yeah some something
like that 700 RPMs less which which of
course isn’t ideal because you know uh
you are basically bogging down the
engine. It’s like you feel like it’s
like
and you know in order to compensate this
speed loss in the corner we would have
to go up like three sprockets or so
because every sprocket difference just
to let you know it’s about 200 RPMs.
It obviously depends from from a few
factors but uh but in this case yeah 200
RPMs. So in this case since we’re
lacking about 650 RPMs yeah we would
need three RPMs more sorry three
sprockets more. So let’s say from 73 to
76. Okay. Uh just to make up the speed
loss. But you can’t do this you know uh
for one corner alone. We can’t have you
know a difference blockage just because
that corner is bad you know because in
other corners is is very close you know
here in the mechanics corner the speed
is very close just is just like 1 km
less 100 RPMs less. And so yeah it
wouldn’t make sense to to change the
sprockets just for this corner. So the
driver has to fix this corner has to
figure out a way to keep up the RPMs
more. Maybe doing the corner a little
bit more wide open on the entry, you
know, a bit more precise at the apex.
You see he’s missing the apex in the
green. It’s going a bit too deep,
missing the optimal racing line. Okay.
And then it’s being a bit also in the X
is not making white only active two. So
it’s it’s yeah, for sure with the RPMs
you can see a lot. But then other very
cool way I use RPMs
is to obviously
tell how brake how efficient was the
braking was. You can use the
longitudinal G, but I I’ll I explain
that in another video. And you can see
very well whether the drivers break hard
or not in with the longitudinal G, which
is this one. Longitudinal G basically
measures the longitudinal acceleration.
So how aggressive your braking and how
efficient your acceleration is. So the
more negative it is, the value like in
this case you can see 083 or 077. The
more negative the value means the more
you break efficiently and hard. And uh
and then when it gets into positive
values is how good the the acceleration
was on yeah just on power. And as you
can see the green in the race actually
did a better job in my opinion because
it just managed to break out quite a bit
harder down to 7,500 RPMs. He used the
brakes way more than in quali. So I
believe that if in quali with a higher
grip of the track if you use the brakes
like in the green it would have been
finding alpha tenth or one10th in this
corner. Um, I’m pretty sure about that.
And and you can see also in terms of
G’s, you can see gets up to 83 0.83
compared to 07080
of of the other session. So you can see
the green has done a way better job. But
I could have told it told it without
watching the longitudal G’s. I could
have told it already by just watching
the RPM. So you know it’s it’s a ch it’s
an easier channel to understand for for
most beginners. So I would suggest you
just use that instead of the longitudal
G uh first. And also here you can see,
you know, how much braking the driver is
using. For example, here is a is a very
fast corner. There’s no need to use that
much brake, but I guess in this case
there was because he arrived a bit more
speed. And so look at that. His peak
RPMs is 11,200 compared to let’s say
11,900. So he used the brakes quite a
bit more. Obviously, there’s multiple
ways I use RPMs. I I then go and to look
at exactly how much uh uh you know how
much u how much um average RPMs there is
through the session so through the lap
so I can assess also the the sprocket uh
but this I mean the topic for another
video I don’t want to I don’t want to
make it too long I don’t want to make it
too complicated but it’s just basically
you can do it in different ways uh you
can either create a custom channel like
that and I I show you it’s actually
quite cool um I mean let me show real
quick. Just do it like that. You know,
you set it to mixed and you can see here
if the the car the sprocket change a
little bit, it looks like in quali
because normally the radius of the tires
changes a little bit like fraction of a
millimeter changes from um from session
to session. You know, the more you what
I’ve noticed over the year is that every
session you do, the tire gets slightly
bigger. Okay. So in terms of diameter um
yeah circumference it goes from let’s
say 84 cm to 84.1 to next session 84.2
to next session key4.3 which is 0.1 mm
but the the bigger the cut the tire gets
the longer the sprocket becomes and as
you can see in the green right the ring
the green seems a little bit longer on
the sprocket because the top speed is is
a bit further up is um and it’s not
related to slipstream
uh I mean there’s a I mean I will talk
more about this in another video I don’t
want to complicate stuff but I say it’s
like uh the higher up here the the line
is basically the the shorter your
sprocket. So you will have like more
acceleration but your your final speed
will be lower. So this is like your
final speed. So this is like a an
overlay between uh speed here in the
bottom and RPM at the top. Okay. So the
the you know the higher up here the the
longer this brocket the shorter sprocket
and the lower up here but you know the
further the further to the right it
means the the longer this sprocket
because you’re going to have a higher
top speed etc. But I’ll explain this
properly in another video. I’m pretty
sure this is going to be very
interesting. So stay tuned for the
channel. Now make sure you subscribe if
you feel this is valuable. I have a bet
going on with my girlfriend till the end
of uh the this the summer. She believes
my channel as and my time will be better
spent in in a different ways. But uh I
want to prove her wrong. So we made a
bet that uh yeah I would have made to
1,000 subscriber by the end of the
summer. Right now, we’re far away from
that goal. We’re at 256. So, please try
to uh to help. And I mean, if this is
helpful to you, just make sure you
subscribe so you can get notifications.
And um yeah, and and and and watch more
videos like that that I believe is going
to make you faster on track. And also,
we we make we prove my girlfriend Ron
that this is not that um that useless as
she thinks. So, yeah, going back to the
real analysis, we were looking. So, we
were talking about the two channels. We
mentioned briefly time, the delta time.
So, delta time is basically it’s not
really a channel. Okay, let’s be honest.
I mean, I I kind of lied to you. So,
delta time is not really a channel. It’s
something that’s coming down here in the
bottom. This is this one basically. You
can you can choose how big to make it.
You can make it like that. You can make
it just super small. I like to have it
se like quite big to be honest because I
think delta time is my religion. I
always sell it to my drivers. Guys, at
the end of the day, whatever you do,
yes, you’re obviously here to learn.
You’re obviously here to push. You’re
obviously here to, you know, find the
limit. But at the end of the day, what
the real thing that we need to care
about in all the setup changes we do, in
all the configurations on the engines we
do, in all the driving you do, it’s are
it’s a delta time. Your corner was
faster or slower. The only way to tell
is by looking at the delta time. So
because the good thing about the delta
time of the A IM
obviously you got to make sure it’s set
to distance based because if you set to
um time base is not going to pop up
here. You see that? So if you are right
now race 3 and you’re wondering oh Alio
why I’m not able to see my delta time
it’s because probably you are set on
time base. So you got to make sure you
click this uh stopwatch here and you
click on set time distance base. And you
can see down below you can find the the
delta time. And it’s really nice. I mean
it’s because it it tells you exactly
where the lap time is is being found
gained or or lost. Okay. So in this case
look at the green. The green as I said
it was the final. At the end of the lap
there’s a 510 gap difference. Okay. Uh
you can see from a 548 of quality to 55
53 in in the heat sorry in the final.
But uh interestingly um yeah the green a
bit because I think the radius of the
tires got a little bit smaller and maybe
picked up a little bit of slipstream
too. Uh but as we saw from the RPM um
scatter plot, it looked like it had a
little bit longer for whatever reason
that the final drive rat the ratio
between the sprocket and the tires, it
was actually a little bit longer on the
sprocket. When I say longer is like a
little bit smaller at the sprocket, you
know, or bigger tires, I mean uh but
yeah, as you can see, the top speed of
the green was a little bit quicker. It
gained almost 110 73,000 until the end
of the straight. Then obviously he lost
uh about one/10enth into the bar corner
turn three. Then he went and lost alpha
tenth in the mechanics corner. Then in
the double left he lost 1.510. All
right. Very interestingly you can see.
And then you can see in the chicane he
lost uh was from 208 to 286. So about
800s. Then we go into the first air pin
and it goes from 289 to 309. So about
the same. Second hairpin loses 1.410 410
as you can see and last her lose is 400
and a half. So that’s my favorite. The
great thing about the A IM the other
time compared to many other you know um
you know software anal like data
software for example like I mean I’m not
going to name names but you know um I’ve
noticed for example with with Starling
it’s great it’s it’s a pretty decent one
but the the only thing I don’t really
like from that is that uh it’s the one
we used to have before it’s called um
Matt Starlane is that the delta time is
not very accurate because it doesn’t
compute the distance with the speed
because guys remember that there is, you
know, to see the delta time, you need to
have some like a software that computes
speed and distance because you can go
super fast through a corner, but if you
make too much distance for that, it’s
going to it’s going to actually uh be a
time loss, you know. So, there’s there’s
got to be a software in this case, AM3,
which does a really good job. But double
check with all your software providers,
Uniro, Alano, whatever you’re using. I
have to double check myself too because
I’m I’m just using AM Rio3. Um I mean I
just like I’m sticking to it. It just
works really well for me. Uh but for um
yeah for other for other like for
whatever you’re using you got to make
sure that the the delta time is
accurate. Otherwise it’s um yeah it’s
going to be a problem. It’s going to
give you false signals because you may
be think oh I’m doing such a good
corner. Look at the delta time. And the
delta time is going really well is is
giving me like lap time which was
happening with us for example in the
brace at Sling and it was like but the
reality is that many times the driver
was making so many meters and even
though it looked like it was super fast
on on the speed the reality was that the
guy was losing because then we would
look at the the sector times of that
specific corner. It was like oh but why
is the sector time slower from to this
compared to the other driver even though
he has so much more speed. So we were
like understanding and then we came to
the conclusion oh the delta time is
wrong. It’s it’s not computing the it’s
not computing the distance. So you make
sure that the delta time comput. But
anyways whatever the whatever you see on
the data at the end of the day you got
to make sure everything is you know is
is is um benchmarked against delta time.
Again here they call it time compare. I
just call it delta time but I mean
whatever. Then the number four and
another hugely important um sensor. It’s
the exhaust temperature also known as
EGT. So why is that important? Well, I
mean uh let’s let’s let’s be honest. I
mean uh the carburation is is key. All
right. It’s absolutely key in in
motorsport in racing. I mean in in
carting I would say uh there’s also
carburation in cars I guess or not. I
mean it’s I think it’s electrical. uh
it’s like electrical injection but
anyways I need to make some research on
that but in carting you have to make
sure the carbureation is spot on
especially in two-stroke engines and you
know in in the OKJ and okay I mean
juniors and seniors or even X30 you can
you can do the carburation with you know
if it’s a membrane carburetor you can do
it like on your own while you’re driving
whereas when you have uh you know the
car like carburetors like um 60 mini or
the KZ ones you can’t manually do do it
by yourself. I can’t recall the name of
of the the carburetor is like yeah in
Italian we say avasceta it’s like yeah
it’s a different it’s the opposite from
membrane basically you just can’t change
the jets while driving right so um let
me show you first of all if you don’t
like the scaling of a IM that you likes
and it’s like you see it’s too you don’t
like it’s because it’s not too um too
clear what you could do is like well
tell pretty much what’s your maximum
minimum and you then you go here and you
can change the maximum minimum you just
click on this Um, you know, you go here
to the channels, you go and click to
this uh cog clog. How do you say? Uh,
yeah, clog cog. Well, sorry for my
English. And instead of 750, I’m going
to put like 725. And instead of 400, I’m
going to put like uh 445. And you can
see now it’s going to be less stretched.
And now I can because I see the minimum
is still not too close. I can make
instead of 445, I can make like 490
because I guess we’re a bit too lean in
the bottom. So, we had to All right. As
you can see now, it’s way more
pronounced. So, it’s much more clear,
right? So, as you can see, there was a
vastly different uh carbburation between
the the two sessions. And I feel that we
were better off in in the race. In
quali, we were a little bit too lean,
unfortunately. So, yeah, I feel that in
quali we left some some time on the
table because we were like up seven2 was
a bit too lean. Um but yeah then I guess
in qual we did a better no in the race
we we improved it quite a bit but we
lost time in the corners obviously cuz
uh cuz I mean obviously we were like a
fourth session on the tires and the
truck got a little bit slower. So yeah
but anyways you can see the difference
in carbation. So it’s again very useful
to see and again by the way we can
create another scatter plot. All right
like the this like similar to what we
did for the RPMs. I’ll explain this and
again in another in another lesson right
in another um not another one I will
explain to you this in another video
more precisely but again you can do
something really cool you can do
basically that all right and this shows
you again how much difference there is
in carbburation whether it’s again
you’re stucking them too make sure it’s
mixed and not and not uh well like
tilted make sure it’s mixed okay so you
can overlay them and so you can see this
is a very cool hack You can see one over
the other and uh and basically you can
see okay the red is way higher. What
does it mean? Which mean it means that
at the given speed let’s say at the same
speed which is like in this case is like
91 km an hour you can see there’s about
almost 40° difference. So it’s like when
it’s like overlapped when it’s like a um
yeah just shifted up it’s too lean. When
it’s shifted down it’s to reach. I mean,
one of the two is either to reach or one
is maybe, you know, maybe the green is
spot on. It’s just the red is too lean,
but anyways. So, I like to use that a
lot. But the real reason I use exhaust
temperature a lot, especially in the
races where you can’t really run um you
can’t really run the the throttle or
brake sensor. It’s it’s forbidden
basically in um in Italy. I mean, I
don’t know in uh in other events in the
US or you know, in Asia, I don’t know.
But uh but in Italy, especially like WSK
or CIK races, you just can’t run the the
throttle brake sensor. I mean, you can
keep them on, but you make sure I don’t
you cannot connect them. I mean, a bit
of I think it’s a bit of a rule
to be honest cuz why would you care? I
think they just do it to prevent the
costs of carting to go too high because
obviously it costs quite a lot to have
all the sensors. But I think it’s still
because you should still let it
I mean you should let people do whatever
they can they they want with the
sensors, you know. But uh but yeah, even
even then we can’t change the rules. So
we’ll stick to what they say. But yeah,
the reason why I use a lot EGT is
because well exhaust temperature is
because you can tell where the throttle
where the driver went on throttle
because the way it works is basically
this. When the driver goes on the
throttle, the EGT goes up. When the
driver goes off the throttle, the EGT
goes down. Okay, the basically the line
goes down. So you can see pretty much
and pretty well how efficient the
throttle uh release is. For example, you
can see here the red release the
throttle more aggressively and
efficiently than this the same the other
session in green. So okay, that’s more
advanced. I’ll show you this in another
video. Uh I I’ll make a note of that. Uh
but yeah, you can you can see the the
steepness of the of the throttle
release. You can see whether the driver
release the throttle properly or not,
which this is a problem I see a lot in
in in many drivers, by the way. And I
also spoke to some Formula 4 engineers
and recently they said a lot of drivers
have this issue and that’s bad because
you’re not letting the differential do
the right thing in car in cars but in
carting as well. You’re not letting the
carburetor inject the fuel that it
needs. So that’s one issue in in in what
I see but I’ll explain this another
video. But the great thing is that you
can see exactly the time the driver goes
on the throttle. You can see in this
case the red goes on the throttle here
whereas the green goes on the throttle
about here. And you can see there’s
about a few meters of difference, you
know. Um there’s a quite a beauty. And
you can see the re the red is leaning
out earlier because obviously it went on
the gas earlier. So I mean there is no
such a thing as the earlier the better
on the throttle. Remember this. Uh it’s
it’s a common uh it’s a common fallacy.
I’ll make a video of this too. Um but
you can see here there’s quite a big
difference. This guy on the red still
the same driver but he went on the gas
67 m here you can see. Whereas in the
green he went on the gas at about 610.
Now, it’s it’s not easy to tell exactly
the moment it goes on the gas because
you can see there’s a bit of like a bit
of like a curve. It’s not like perfectly
up and down. Even though we are using
the the the most rapid A IM EGD sensor,
it’s still it’s not easy to say exactly
meter by meter where it’s going to
throttle, but you can assume you can
guess. And look again here we’re going
into the GKE and there’s a quite a big
difference in throttle application. And
if you say this driver goes on the red
goes on the gas at 784 whereas the green
goes on the gas at 787 is about 3 km uh
three 3 m difference. The first hairpin
is about the same. Then the next corner
the second one there’s about like one or
two meters difference in throttle. The
last corner is pretty much the same. But
you can see it’s great because you can
tell how early or late the driver is
going on throttle. And yeah it’s quite
useful especially between driver to
driver when you’re comparing the same
driver different sessions. you’ll see
very similar, you know, patterns. But
it’s good when you when you compare
against other drivers because you can
see whether uh it’s faster to go on the
throttle earlier or whe it’s fast to go
on the throttle later because as I said,
sometimes you’ll maybe tempted to go on
the gas earlier and earlier, but the
reality is that if you go too early,
you’re going to generate push under
steer. You’re going to go even wider on
the exit. You’ll probably end up with
too much steering wheel on the exit and
your exit speed is going to be not good
enough. So, and by doing so, you also
lean out the engine, which is again not
that ideal in some some occasions when
your engine is really quite lean. So,
these are my four channels, my go-to
channels, which you know, as a beginner,
uh would be what I would suggest you to
start. So, number one, as I said, was
the speed. All right, the GPS speed,
which you can have uh the GPS, but you
can also have the axle, the rear axle,
the speed, which is very accurate. You
can buy it on the on the on the Yeah. on
on on the A IM website. You can you just
need an extension
between between the between the Micron 6
and the sensor just to connect the the
things. It doesn’t connect right away to
the to the mic. You need an extension.
It’s called an expansion. Then the
second one I mentioned was the RPM
because you can validate the speed when
there is a spikes and also to tell the
sprocket. You also want to tell the
braking efficiency etc. And the third
one is, as I said, the delta time, which
is not really a sensor, but it just make
sure you’re there by making sure you’re
in distance base instead of instead of
base time base. And the fourth is
obviously the EGT exhaust temperature
because you can tell obviously the
carbburation, which is really really
important. And also you can coach the
driver by telling how efficient he is on
the throttle release, but also on the
throttle the throttle pickup point
whether he’s picking up the throttle at
this specific place or at this other
specific place whether it you got it he
has to go a bit earlier where he has to
go a bit later cuz remember there’s no
such a thing as the earlier the better.
you just have to go on the gas otherwise
point and it’s going to change from
session to session I guess from setup to
setup and um but yeah it’s normally at
around the apex point that’s when you go
on the gas but it depends from category
to category. Okay, I hope this was
useful. Let me know in the comments if
you got um some questions or if you have
uh some other video ideas you’d like me
to cover. I’ll be very happy to yeah to
consider those and uh I’ll I’ll make a
I’ll I’ll shout out to you in the in the
next video if you if you come up with a
with a great idea whether it’s data
analysis or any kind of driving
technique about carting. I’ve got 22
years in in this world now and I feel
that uh uh yeah with these 22 years in
in in the carting environment I feel
that I’ve accumulate enough experience
um I can obviously accumulate more but I
can I can confidently now talk about
many many topics with confidence that uh
yeah you’re going to get a lot of value.
So I hope this was useful. It’s now 8:53
a.m. I got to go to the track. I had
this early morning and I need to go to
the track to to our summer camps at baby
race to do some coaching and uh yeah
make sure the drivers have u [snorts]
some a lot of improvements during the
day. I’ll see you next time.
Send your onboard footage. Alessio reviews it corner-by-corner and tells you exactly what's costing you time — and how to fix it. Back within 48 hours.
Get My Onboard Reviewed → Reviewed personally by a CIK FIA World Champion — never an assistant.I promise I'll not spam you with repurposed shitty AI content but real experiences that only I, Alessio Lorandi, experienced. Written in my funny English-Italian tone of voice 😂
Alessio Lorandi is the former CIK FIA World Junior Champion, winning against Lando Norris in 2013 & F3 multiple race winner. He's helped 200+ karting drivers worldwide get faster & win WSK titles with BabyRace Driver Academy & now through Senndit, his online karting coaching platform.